
The thought of silent, radiant warmth rising from your floors is the ultimate in home comfort. But practical questions quickly follow: Will it work with my existing tiles or timber? Is the installation a major disruption? How much will it raise my floor height? These concerns can make the decision to install professional floor heating under your floors feel complex, often creating more questions than answers and preventing homeowners from choosing the most efficient heating solution available.
This commitment to quality and process is what sets a leading trade business apart. For other specialists in the HVAC, plumbing, or electrical fields aiming to elevate their own service standards, it can be beneficial to explore In-depth Business Diagnostic options to identify areas for growth and improvement.
As hydronic heating specialists, we believe in clarity and confidence. This professional guide removes the uncertainty. We will walk you through the exact installation methods for hydronic systems beneath concrete, tile, and timber floors. You will learn what to expect from a trusted installation, understand the key differences from DIY electric kits, and see how a properly installed system delivers unparalleled efficiency and comfort without compromising your home’s design. Prepare to feel confident about achieving truly invisible, luxurious warmth.
Understanding What Goes Under the Floor: Hydronic vs. Electric
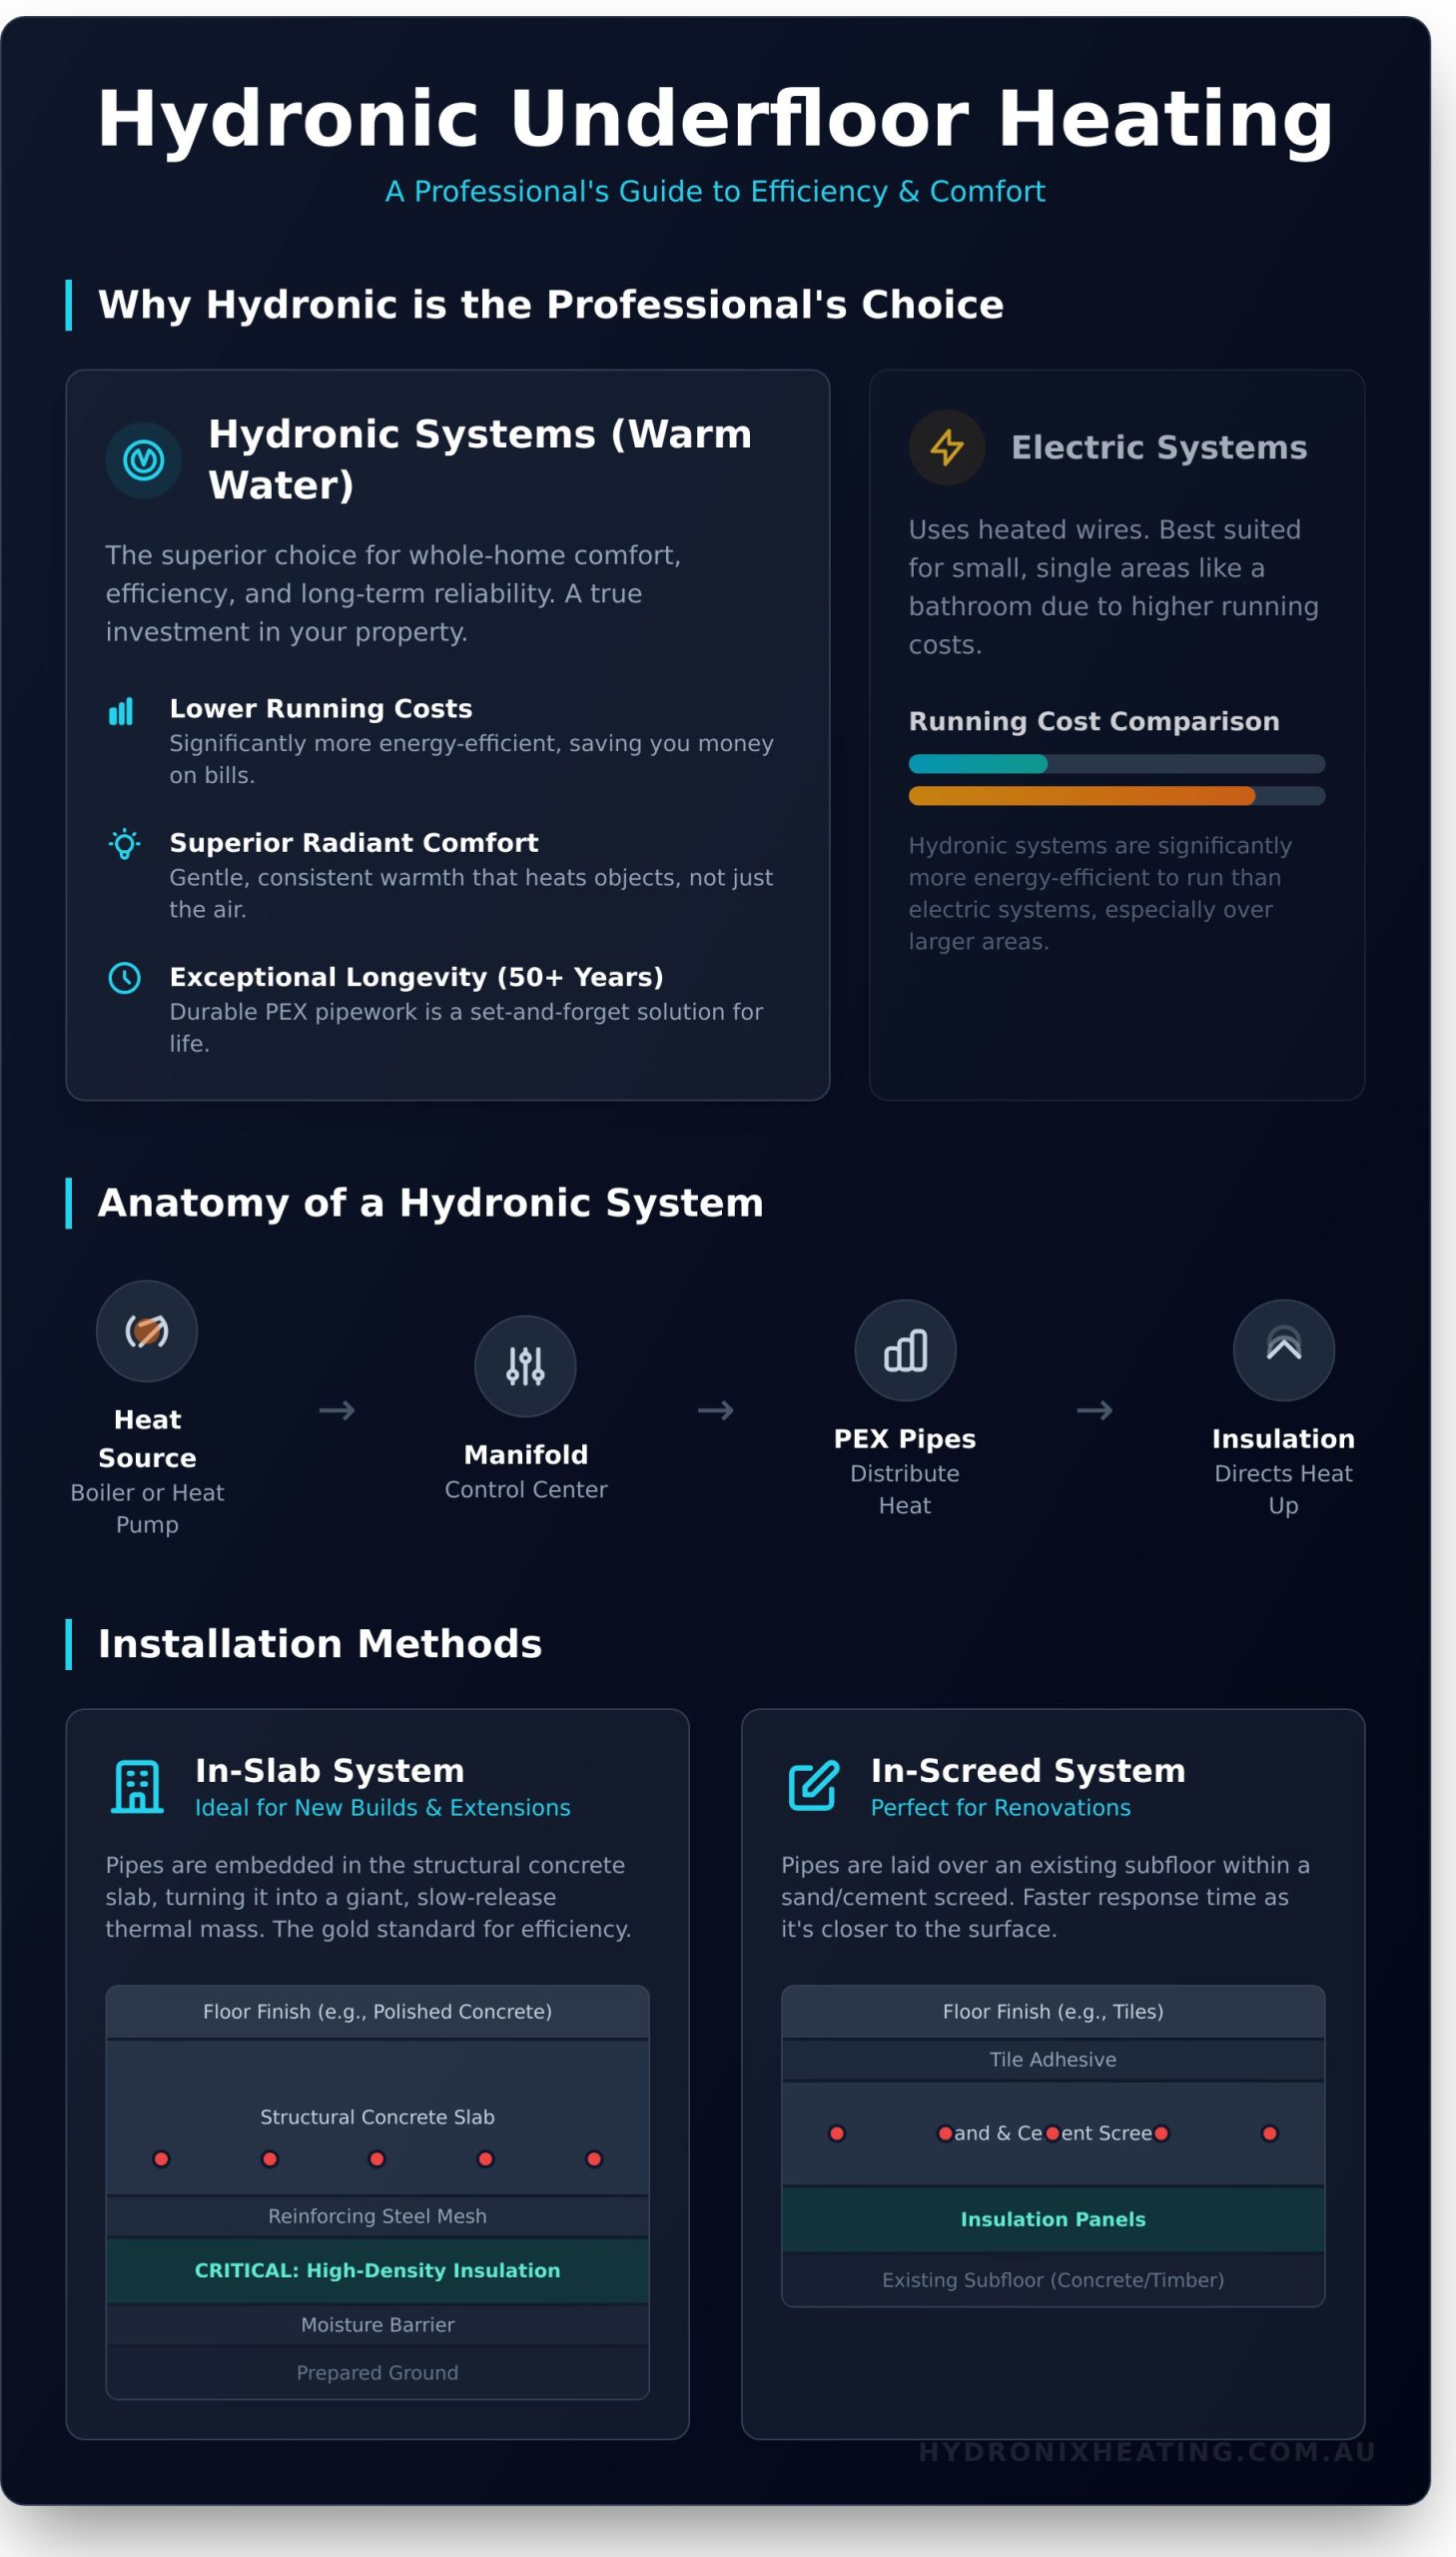
Underfloor heating is a sophisticated system of pipes or wires installed directly beneath your floor finish, turning your entire floor into a quiet, efficient radiator. This highly effective form of central heating comes in two primary types: electric systems, which use heated wires, and hydronic systems, which circulate warm water through pipes. While both have their place, at Hydronix, we specialise in hydronic solutions. Our decades of experience have shown that for whole-home comfort, superior efficiency, and long-term reliability, nothing outperforms a professionally installed hydronic system.
The Key Components of a Hydronic System
A successful installation of floor heating under your chosen surface relies on a few critical, high-quality components working together seamlessly. These are the core elements our specialists install:
- PEX Pipes: This stands for cross-linked polyethylene, a highly durable and flexible pipe designed specifically for hydronic heating. It’s laid out in precise patterns to carry warm water and distribute heat evenly across the room.
- Insulation Panels: Just as important as the pipes, these high-density panels sit beneath the pipework. Their critical role is to prevent heat from escaping downwards, directing it upwards into your living space for maximum efficiency.
- The Manifold: Think of this as the system’s control centre. The manifold distributes heated water from the source to the various pipe loops (or ‘zones’) throughout your home, allowing for individual room temperature control.
- Heat Source: The system is powered by a central heat source, typically a high-efficiency gas boiler or an environmentally friendly heat pump, which heats the water before it circulates through the pipes.
Why Hydronic is the Professional’s Choice
When heating specialists evaluate options for a complete home, hydronic systems consistently come out on top. The long-term benefits deliver a superior return on investment and unmatched comfort for Australian homeowners.
- Lower Running Costs: While the initial setup cost can be higher than electric, hydronic systems are significantly more energy-efficient to run, leading to substantial savings on your energy bills, especially over larger areas.
- Superior Comfort: Hydronic heating provides a gentle, radiant warmth that heats objects and people in the room directly. This creates a more consistent and comfortable ambient temperature without the stuffiness of forced-air systems.
- Exceptional Longevity: The PEX pipework installed under the floor is incredibly durable, with a lifespan often exceeding 50 years. It’s a true set-and-forget solution built to last the life of your home.
- Ideal Whole-Home Solution: Unlike electric mats often used for single bathrooms, a hydronic system is robust enough to provide consistent, controllable warmth for your entire property.
Installation Method 1: Floor Heating Under Concrete Slabs (In-Slab)
For new home builds or major extensions, installing floor heating under a structural concrete slab is the gold standard for efficiency and comfort. This method is particularly popular for homes featuring polished concrete floors, creating a seamless and luxurious finish. The system works by embedding hydronic pipes directly into the concrete during construction. The slab itself becomes a thermal mass, absorbing, storing, and gently radiating heat upwards. This process of radiant heating provides a consistent, silent, and deeply comfortable warmth that other systems cannot match. Because this method is integral to the building’s foundation, meticulous planning at the architectural stage is not just recommended-it’s essential for a flawless result.
Preparing the Base and Insulation
The foundation of an effective in-slab system begins well before any pipes are laid. First, a moisture barrier is installed over the prepared ground. Next, high-density insulation boards are laid down. This is a non-negotiable step; skipping insulation is a critical error that causes significant heat loss downwards into the ground, drastically reducing efficiency and increasing running costs. Finally, reinforcing steel mesh is positioned over the insulation, which will serve as the framework for securing the pipework.
Laying and Securing the Pipework
With the base prepared, our expert technicians methodically lay out the durable PEX (cross-linked polyethylene) pipework. The pipes are typically arranged in a specific pattern, such as a bifilar (snail) coil, to ensure the most even heat distribution across the entire floor surface. Each pipe is meticulously secured to the reinforcing mesh at precise intervals using specialised clips or ties. This prevents any movement during the concrete pour. All pipe loops are then run back and connected to a centrally located manifold, which acts as the control hub for the entire system.
Pressure Testing and Concrete Pour
Before the concrete pour, we perform a crucial pressure test on the entire pipe network. The system is filled with water and pressurised to well above its normal operating pressure to guarantee there are zero leaks. This test is maintained throughout the concrete pour to provide an immediate alert if any pipe is damaged. We coordinate closely with your building team to ensure the pour is conducted carefully, protecting the integrity of the heating system. Once poured, the concrete must cure for a specified period-typically 28 days-before the floor heating under the slab can be commissioned and enjoyed.
Installation Method 2: Floor Heating Under Tiles and Screed (In-Screed)
The in-screed method is a highly effective and popular solution for installing hydronic floor heating under a new floor finish, particularly during renovations. This system is laid over an existing structural subfloor, such as concrete or timber, making it an ideal choice for projects in bathrooms, kitchens, and living areas where you want responsive, luxurious warmth without replacing the entire foundation.
Compared to an in-slab system, an in-screed installation offers a much faster response time. Because the heating pipes are positioned closer to the final floor surface within a sand and cement screed, the system heats up and cools down more quickly. The primary consideration for this method is the change in finished floor height, as the combination of insulation, pipes, and screed will typically add 60-80mm before your tiles are laid.
Preparing the Existing Subfloor
A successful in-screed installation starts with a meticulously prepared base. Our expert technicians ensure the existing subfloor is structurally sound, clean, and perfectly level. The next critical step is laying high-density insulation boards directly onto the subfloor. This prevents heat from escaping downwards, directing it upwards into your room where it belongs and maximising system efficiency. PEX pipes are then fixed securely to the insulation using specialised staples or clips, laid out in a precise pattern to guarantee even heat distribution.
Applying the Sand and Cement Screed
Once the pipework is in place, a sand and cement screed (typically 50-70mm thick) is poured to completely encase the pipes. This screed layer is not just a covering; it forms a thermally conductive mass that absorbs heat from the pipes and radiates it evenly across the entire floor surface. This principle is fundamental to creating an efficient system, as detailed in the Department of Energy guide to radiant heating. The screed must be allowed to cure fully, a process that can take several weeks, before any tiling can begin to prevent cracking.
Final Floor Finish: Tiling
Tiles are the perfect partner for in-screed hydronic heating. Materials like ceramic, porcelain, and natural stone have excellent thermal conductivity, meaning they transfer heat from the screed to your feet quickly and efficiently. To accommodate the natural expansion and contraction that occurs during heating cycles, it is essential to use a high-quality flexible tile adhesive and grout. This prevents tiles from cracking or lifting over time, ensuring a durable and flawless finish.
Planning a bathroom renovation? Ask our experts about in-screed heating.
Installation Method 3: Floor Heating Under Timber and Floating Floors
A common question we receive from homeowners is whether hydronic heating is compatible with timber floors. The answer is a definitive yes. Modern, specialised ‘overlay’ systems are expertly designed for this exact purpose, providing luxurious warmth without compromising your choice of floor finish. These low-profile systems are laid directly over an existing structural subfloor (like concrete or particleboard), making them the ideal solution for renovations where minimising any increase in floor height is a critical concern.
The installation process for floor heating under these finishes is clean, efficient, and highly effective when handled by experienced technicians. The key is using the correct components to ensure optimal performance and protect the integrity of your flooring for years to come.
Using Pre-Grooved Insulation Panels
The foundation of a successful overlay installation is the use of pre-grooved, high-density insulation panels. These specialist boards serve a dual purpose: they prevent heat from escaping downwards and provide perfectly sized channels for the hydronic pipes to sit in securely. Most high-quality panels are fitted with aluminium heat spreader plates, which are essential for distributing warmth quickly and evenly across the entire floor surface, eliminating cold spots and improving system efficiency.
Key Considerations for Timber Flooring
While timber is an excellent choice, selecting the right type and controlling the system correctly is vital to prevent damage. Our specialists always advise on the following critical points:
- Use Engineered Timber: We strongly recommend using engineered timber that is specifically rated by the manufacturer for use with hydronic underfloor heating. Its layered construction provides greater stability against temperature changes compared to solid timber.
- Avoid Solid Timber: Solid timber is generally not recommended as it is more susceptible to expansion, contraction, and warping when exposed to direct, consistent heat.
- Control Surface Temperature: A professional installation must include precise temperature controls to ensure the floor surface never exceeds 27°C. This protects the wood’s finish and structural integrity.
Installation with Carpet and Other Finishes
Hydronic floor heating under carpet is another excellent option for creating a warm and comfortable living space. The key to success is ensuring efficient heat transfer. This is achieved by selecting a carpet and underlay with a low combined tog rating (ideally below 2.5). Similarly, high-quality laminate and vinyl flooring are also compatible, though it is always essential to follow the specific guidelines provided by the flooring manufacturer. For expert advice on the right system for your home, contact the specialists at Hydronix Heating.
Why Professional Installation is Non-Negotiable for Hydronic Systems
While simple electric mats can be a weekend DIY project, a hydronic system is a complex network of plumbing integrated directly into your home’s structure. It’s a permanent addition. Once the concrete is poured or the floor is laid, there is no easy way to fix fundamental mistakes. At Hydronix, our ‘repair-first’ philosophy comes from years of fixing systems that were poorly designed or installed from day one. We know what can go wrong, which is why we ensure it doesn’t.
A poorly designed system won’t just be unreliable; it will be inefficient, costing you more to run for less comfort. Getting the installation of your floor heating under your flooring right the first time is the only option.
System Design and Heat Load Calculation
A hydronic specialist doesn’t guess. We perform precise heat load calculations for every zone to determine its exact heating needs. This critical data dictates the correct pipe spacing, water flow rates, and boiler size required for optimal performance. Proper design is the foundation of an efficient system, eliminating cold spots and guaranteeing your home is heated evenly without wasting a dollar on energy.
Ensuring Long-Term Reliability and Safety
The long-term reliability of your system depends on meticulous installation steps. The most critical of these is pressure testing the entire pipe network before it is covered. This is the only way to guarantee a leak-free system for life. Furthermore, every connection to the manifold and boiler must be flawless. Our professional installation is backed by a comprehensive workmanship guarantee, giving you complete peace of mind that your investment is protected.
Avoiding Costly Mistakes
Attempting a hydronic installation without specialist expertise can lead to significant and expensive problems. The most common issues we are called to fix include:
- Inefficient Heating: Incorrect pipe layout results in uneven warmth and high running costs.
- Excessive Heat Loss: Forgetting or improperly installing under-slab insulation means you’re heating the ground, not your home.
- Pipe Damage: Inexperienced installers can easily puncture or kink pipes during installation, leading to leaks that are catastrophic to fix once the floor is down.
A hydronic system is a long-term investment in your home’s comfort and value. Don’t risk it with a subpar installation. Get a professional quote from Melbourne’s hydronic specialists.
Ensure Your Underfloor Heating is Installed for Lasting Performance
As we’ve explored, the success of your project depends on choosing the right installation method for your specific floor type, whether it’s concrete, tile, or timber. Installing floor heating under your surfaces is a significant investment, and for hydronic systems, professional expertise isn’t just recommended-it’s essential for ensuring optimal efficiency, safety, and long-term reliability. A flawless installation is the foundation of years of silent, luxurious warmth.
At Hydronix Heating, hydronic systems are all we do. As Melbourne’s trusted hydronic heating specialists, we bring focused expertise to every project, from new builds to existing homes. We stand behind our meticulous work with a comprehensive six-year workmanship guarantee, giving you complete peace of mind. Don’t leave your comfort to chance. Schedule a consultation to plan your underfloor heating installation and let our experts design the perfect solution for you.
Frequently Asked Questions
Can floor heating be installed under the floor of an existing house?
Yes, retrofitting hydronic heating into an existing home is a common and highly effective upgrade. For homes with sufficient sub-floor access, our specialists can install pipework from below with minimal disruption. For concrete slab homes, we use specialised low-profile “over-floor” systems that are laid directly on the existing slab before your new flooring is installed. Our expert team will assess your home’s structure to recommend the most efficient and practical method for your property.
How much will hydronic underfloor heating raise my floor level?
The increase in floor height depends entirely on the system type. For in-screed systems used in new builds or extensions, the pipes are embedded within the concrete, resulting in no additional height. For retrofitting in existing homes, our specialised overlay systems are designed to be minimally intrusive, typically raising the floor level by only 15mm to 25mm before your final floor covering is added. We always confirm the specific height implications during our initial consultation.
What happens if a pipe leaks under the floor? Is it a disaster?
A leak is extremely rare with professional installation and is not a disaster. Modern hydronic pipes are incredibly durable and installed in a continuous loop from the manifold, meaning there are no joints or weak points beneath the floor. In the unlikely event of a puncture, the system’s pressure gauge will drop, alerting you to an issue. Our specialists can then use thermal imaging to pinpoint the exact location for a swift, targeted repair with minimal disruption.
Which is better for underfloor heating: a gas boiler or a heat pump?
Both are excellent heat sources, but the best choice depends on your home’s energy profile. Gas boilers provide rapid heat-up times and are a trusted, reliable option. Air-source heat pumps are highly energy-efficient and can significantly reduce running costs, especially when paired with solar panels. As hydronic specialists, we analyse your property and energy usage to provide a clear recommendation on the most cost-effective and efficient solution for your specific needs.
How long does a professional underfloor heating installation take?
The installation timeline varies with the project’s size and complexity. For a typical existing home of around 100-150 square metres, the pipework installation can often be completed in 3-5 days. For new builds where the system is laid before the concrete screed is poured, the process is even faster. We provide a detailed project schedule before any work begins, ensuring you have a clear understanding of the timeline from start to finish.
Is hydronic floor heating better under tiles or timber floors?
Hydronic floor heating under both tiles and timber provides exceptional comfort, but they perform differently. Tiles and polished concrete have high thermal conductivity, meaning they heat up quickly and transfer warmth into the room very efficiently. Engineered timber is also an excellent choice, though it may have a slightly slower response time. Our experts will always ensure the system is correctly designed and calibrated for your chosen floor covering to deliver optimal, luxurious warmth.